Table of Contents
Dolibarr connector
Installation
Standard installation
If you get the module in a zip file (like when downloading it from the market place Dolistore, go into menu Home - Setup - Modules - Deploy external module and upload the zip file. To connect the Mobilid application you need to select the Dolibarr Custom connector in the Mobilid setup.
Root installation
You can also use old Dolibarr root procedure. Place module_extdirect-1.0.x.zip file into dolibarr root directory on your server. Uncompress file with command:
unzip module_extdirect-1.0.x.zip
For this mode you need to select the Dolibarr Root connector in the Mobilid setup.
Git clone installation
The connector module files are located in the 'extdirect' subfolder of the git repo. You can clone the repo in your dolibarr custom folder, but you need to make a symbolic link to the 'extdirect' subfolder. For the community version dolibarrextdirect you need to run command:
ln -s dolibarrextdirect/extdirect extdirect
For the payed dolibarr-mobilid you need to run command:
ln -s dolibarr-mobilid/extdirect extdirect
For this mode you need to select the Dolibarr Custom connector in the Mobilid setup.
Module setup
Activate module
To use this module, you must first enable it.

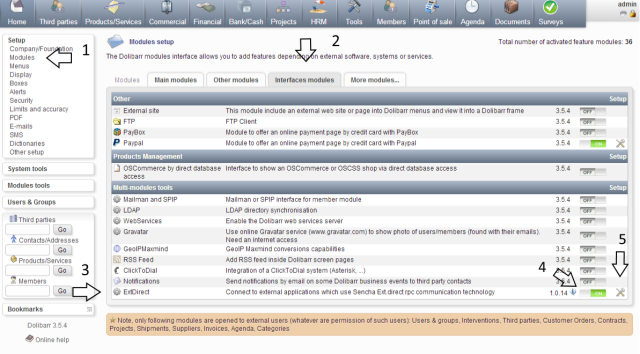
- With an administrator account, go on page “Home - Setup - Modules”.
- Choose the “interfaces modules” tab.
- Look for the “MOBILID CONNECTOR” or “EXTDIRECT” module.
- Then click on “Activate” toggle switch.
- Click on module configuration icon to setup the connector.
Module administration
Mobilid connect
Automatic assignment
This mode will automatically connect Mobilid to your system, only use this mode for demo purposes.

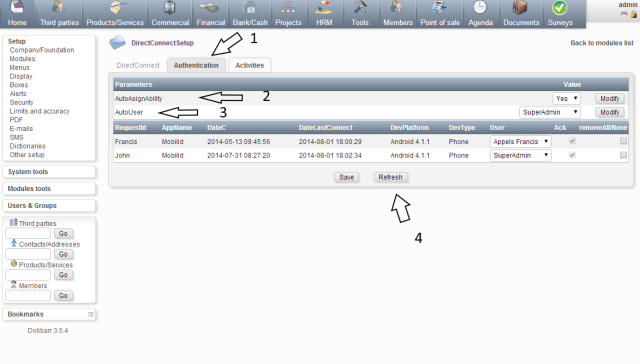
- Choose the authentication tab.
- Set Parameter 'Auto Assign' to 'yes' and click 'Modify'.
- Set 'Auto User' parameter to user which will be assigned to every Mobilid connection and click 'Modify'.
- Click 'Refresh' to see new connections.
Controlled assignment
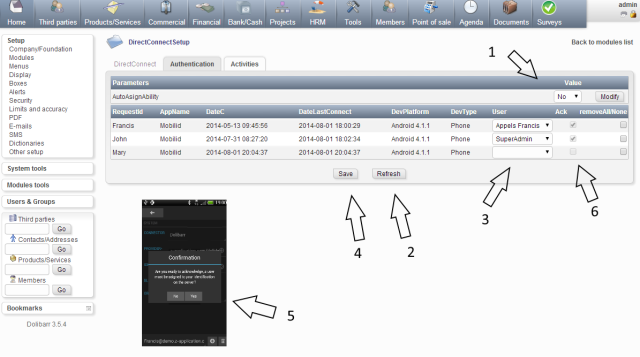
In this mode you need to confirm each new Mobilid connection, you can also remove (block) a connection. If you remove a connection in the settings screen of the Mobilid app, it will also be removed from the connector.

- Set Parameter 'AutoAsign' to 'No' and click 'Modify'.
- Connect Mobilid (Set URL and Indentification in Mobilid Settings and push back button) and click 'Refresh'.
- Select Dolibarr user to assign to the connection request.
- Click 'Save'.
- Tap 'Yes' in Mobilid to confirm the connection.
- When you 'Refresh' again you should see the 'Acknowledge' flag set.
You can use this screen also to monitor which type and when a device was last connected. The list is sorted on last connection.
After connecting you can change still change assigned Dolibarr user or the request identification in the Mobilid app.
Important, when adding a connection your need to tap the '+' button, only when moving your server you may change the connection URL
Activity tracking
Choose the Activities tab to see all activities of the connected apps. You can see when a Mobilid module was started and finished (timetracking), the duration between start and finish is also shown. You can filter activities by dolibarr user, when filtered you will have links to the objects handled by an activity.
Module update
When an existing installation is updated, disable and re-enable module to update module database.
Module usage
This chapter gives you some tips on how to manage actions performed by Mobilid in the Dolibarr ERP System. Give the Mobilid user the correct permissions to the modules used by Mobilid. All stock related modules are compatible with the Dolibarr lot/serial module.
Stock Inventory
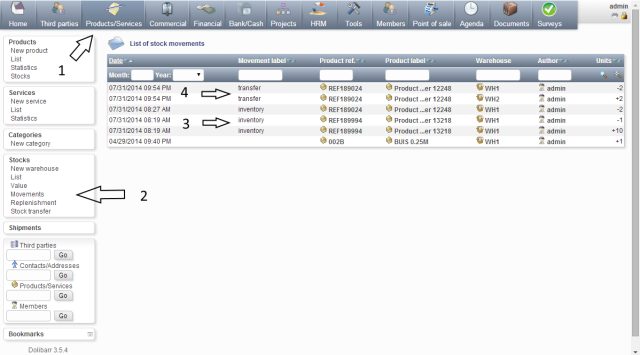
You must enable the 'Products' and 'stocks' modules to be able to use the Mobilid Inventory module. Check your stock value before start counting your stock qty, Mobilid will adjust qty immediately.The changes done by the module can be monitored in the 'Stock movements' list in Dolibarr.

Tip: When you start using Dolibarr and you have an existing stock, first add all your products into Dolibarr. Then go to your warehouse and enter the physical stock amounts using Mobilid.
Order Picking
Enable the Shipments module, the picking module will create draft shipments from the collected orders. You still need to validate end send the shipment using the Dolibarr system.
Prospect contacting
Enable the Agenda module, to be able to add events.
Order creating
The order module will create Draft orders, you can validate them in Dolibarr. If required, you can print the order to have it signed by the Customer. Mobilid has not yet the ability to sign orders.
Dispatch supplier order
This is an optional module, please contact Z-Application for receiving a licence key. You need to activate the option 'Increment stock on Dispatch supplier order' in the 'Stock' module.